![]() he making of the houses is straight forward and I assume it is easy enough to see where to cut. The Flaps are filled with an arrow pattern. The arrows point towards the edge of the flap that must not be cut. All orange rectangles
he making of the houses is straight forward and I assume it is easy enough to see where to cut. The Flaps are filled with an arrow pattern. The arrows point towards the edge of the flap that must not be cut. All orange rectangles ![]() stand for holes and have to be cut out. All red rectangles
stand for holes and have to be cut out. All red rectangles ![]() have only to be cut out when you build a certain version. A steel-ruler and a sharp modellers's knife are better suited for cutting the buildings than scissors. But keep the cutting to the paper as cutting yourself will hurt awfully (believe me I tried).
have only to be cut out when you build a certain version. A steel-ruler and a sharp modellers's knife are better suited for cutting the buildings than scissors. But keep the cutting to the paper as cutting yourself will hurt awfully (believe me I tried).
All flaps are folded away from the printed side. And the walls are folded at the respective corners. Usually (space permitting) there are also folding lines to indicate where the paper has to be folded. If the folding line is red than the paper has to be folded towards the printed side.
![]()
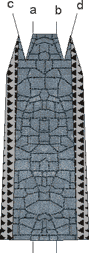 Buttresses
They are difficult to build, but they make a lot of difference in the appearance, so give it a try. If you follow these steps carefully you will manage.
Cut out the outline only roughly, so that the folding lines are still visible and the flaps have more mass, so that they are easier to fold.
Fold along the lines away from the printing.
Trim the outline.
Cut a straight line along edge c from the corner of the touching flap to the intersection between fold a and the extended edge c (orange line in the picture on the right).
Do the same using edge d and fold b.
With those two cuts you have created the "lid of the buttress" and two mini flaps which have the stone pattern on their outside.
Fold the lid away from the printing.
Put glue on the inside of the mini flaps. Hold the buttress in the shape it should have, bend the lid, accordingly and glue the inside of the mini flaps (unprinted) to the outside of the buttress wall (printed).
Glue the buttress to the wall using the two bigger flaps.
And that's it.